When I was a kid I wanted a telescope. So one day I got together what money I had, probably the proceeds of a birthday or christmas, and went into town with my mother to buy a scope. It was just going to be a simple refractor aimed at kids, probably good enough to make out the planets but little more - not that I knew what a refractor was, let alone it's capabilities.
We got up to the counter and there on the shelf was what we were looking for. I was ready to hand over my money and begin my new career as an astronomer. I was excited!
But then I saw something else on the shelf beside the telescope... and I get even more excited!
Now if you put both of these items in front of a bunch of kids and asked them to choose, I'd imagine the telescope would win hands down. But this other item caught my attention due to just one thing, the brand. It was QuickShot!
QuickShot was mainly known for making computer game controllers, joysticks etc., but I wasn't aware of that at the time. Although when I did buy my first joystick and joystick port card they were most definitely QuickShot. Because I was trapped into brand loyalty, and it was all due to this...
the QuickShot Gun Fighter!
This had been a bit of a surprise christmas gift when I got it (the surprise perhaps being that there was a gift at all, due to the source), and it was the coolest thing I had ever seen! As childhood christmas gifts went it was second only to the complete surprise of a NES sitting under the tree.
The Gun Fighter was a laser tag gun available before the market became saturated similar products, at least I was the first of anyone I knew to have something like it. And when my friends eventually got some, mine was still superior (it was!), but the fact that they didn't work so well together did put a bit of a dampener on it.
So as I stood there in the shop looking at this
thing with QuickShot on the front of the box, all rationality went out the window.
It was definitely no telescope, although it did have some telescope like features I told myself, so I could get the best of both worlds. It would be just as good if not better than a telescope, because it was QuickShot just like the gun!
What it really was was this toy telescopic-camcorder type thing that let you zoom in on things at from "distance". It had lights and a microphone and probably some other little bit 'n pieces that I can't remember. The details aren't really important, suffice to say that despite my mothers best efforts I did not walk away with a telescope that day. Or any other day.
I was stuck with my gimmicky toy and my soon to follow buyers remorse and another mistake for my if-I-had-a-time-machine list (although I did get some use out of the amplifying microphone, putting it to nefarious ends!).
So I never made any astounding astronomical discoveries that I
surely would have if I had bought the telescope.
But now 20 years later that shall all change!
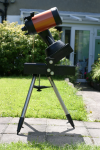
My christmas gift this year probably tops the NES (...just about). It is a 6 inch
Schmidt-Cassegrain telescope.
I've been out with it a number of times since the start of the year, although decent clear nights have perhaps been a bit few and far between.
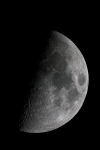
I've gone through all the usual beginners stuff; looking at the moon and planets, trying in vain to catch a glimpse of a galaxy, even taking a few basic photos.
But what I really want to start getting into now is some proper deep-sky astro-photography.
In order to do so there are some hurdles that need to be overcome. The first is the telescope itself, or rather its mount. My telescope, the Celestron NexStar 6SE, has an Alt-Azimuth GoTo mount that attaches directly to a tripod. Out of the box it is great for visual observing, but comes up short when it comes to photography.
In order to capture the faint deep sky objects like galaxies and nebulae you need long exposure times, so long that the rotation of the sky can ruin the image. To prevent this the telescopes mount needs to follow the motion of the sky, but Alt-Azimuth mounts are not quite up to the task unaided.
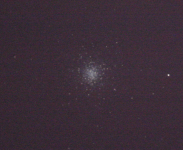
Here is one of my first attempts at a 'long' exposure.
This is a image of the M3 globular cluster. It is a series of 10 stacked 30 second exposures. 30 seconds is about the limit for my scope without a perfect initial alignment, but even then 45 seconds is about the maximum. After that noticeable streaking begins to creep in. This is the limits of mounting parallel to the ground.
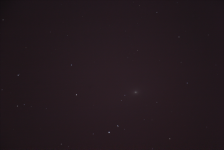
And 30 seconds doesn't quite cut it. The faint cloud in this image (click to view the bigger version)...
is the core of the
M81 galaxy.
Yeah... not quite up to scratch.
To get longer exposures on an Alt-Az you need to mount it equatorially; that is to tilt it at an angle that corresponds to your latitude, so that when the telescope is pointed 'up' it is pointing at the north celestial pole (right beside the star Polaris). This allows the mount to follow the sky using just one of its motors instead of trying to keep up with two (and which it obviously fails at), allowing for exposures of possibly five minutes or more.
In order to do this you need what is knows as an equatorial wedge, which sits between the tripod and the mount and tilts the telescope at the appropriate angle.
As you might imagine astronomy is not a cheap hobby, full of expensive bit and pieces and a life of constant upgrades. The wedge for my particular mount would be about 200-300 euro, and this being Ireland closer to the 300 euro side. From my point of view that was a lot of money for something that may not see too much further use if I upgraded in the future. I figured if I were to spend at least that much money I'd be better off going a little bit further and get a real equatorial mount, which would be much more useful for future upgrades and allow for much longer exposures.
So if I were to buy that is what I'd do, but I'm not exactly in a position to be buying things right now. So I'm stuck... unless, I made one myself. I mean a wedge is not exactly a highly technical piece of equipment. Granted, there is a degree of precision required for proper alignment, but still, it is just getting something to tilt at a set angle. The DIY gene kicked in!
It seemed pretty straightforward, and I also had a wealth of telescope mounting construction experience to draw upon!
After my first year in college I used a student work program to find some work for a few weeks of the summer. Only one listing in the catalogue had any immediate appeal for me, which was the one for Astronomy Ireland. It was an
interesting few weeks, the first few of which involved sanding, painting and assembling wooden telescope mounts in a tiny shed in the back garden of a private house (luckily I wasn't in the group that ended up having to paint that house to get it ready for a private sale).
What we were putting together back then and what I was looking to make now were nothing at all alike, other than both ending up painted black and were somehow connected to an actual telescope, but I'm sure that experience helped... somehow.
There was a bunch of left-over wood in the garage that I decided to use. I threw together a quick model in AutoCAD to figure out the various dimensions needed, mainly to ensure that the axis of rotation of the optical tube would be centred over the tripod to help balance things.
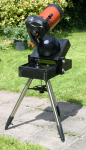
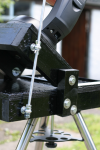
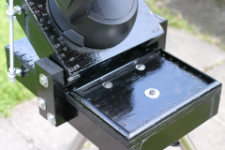
Over the course of about two weeks spent making crooked cuts and drilling off-center holes (I think my DIY gene has developed a mutation) along with getting the extra little bits and pieces needed (this county has gone all metric when it comes to bolts, so it's very hard to find a UNC thread, which the telescope has since it comes from the US. silly yanks!), and a bit of sanding and painting, I've finally ended up with something to mount my telescope on.
As you might notice I perhaps went just a little overboard with the screws, but I didn't want to have the whole thing fall apart with a couple of grands worth of equipment (cameras etc. wired up to laptop) crashing to the ground for lack of support. Better safe than etc. etc...
All I need now is a clear night (which the last two have been, but I unfortunately wasn't ready for) to test out how well I can do an equatorial alignment on this setup. Then I might just get a picture of a galaxy that isn't just a fuzzy indistinct blob.
I have a few more items that may be getting the DIY treatment to help in my astromonical pursuits. Soldering irons will be involved!